
Learn how to configure private networking between a Public Cloud instance and a Dedicated Server.
The OVHcloud vRack allows you to configure private network addressing between two or more OVHcloud Dedicated Servers. But it also allows you to add Public Cloud instances to your private network so that you can create an infrastructure of both physical and virtual resources.
Requirements
- An OVHcloud Public Cloud instance
- A vRack service activated in your account
- A Dedicated Server compatible with vRack
- A private IP address range of your choice
- Both services must be in the same vRack
OVHcloud Control Panel Access
- Direct link: Public Cloud Project
-
Navigation path:
Public Cloud> Select your project
NOTE: This feature might be unavailable or limited on servers in the Eco product line.
Please visit our comparison page for more information.
Instructions
Add a Public Cloud project to the vRack
This does not apply to newly created projects, which are automatically delivered with a vRack. Once the project has been created, you can view the vRack by opening the Network menu in the left-hand sidebar and selecting vRack Private Network.
You can also remove the project from its allocated vRack and attach it to another vRack if you wish, particularly if you already have an existing vRack with your dedicated server(s).
From the vRack section of OVHcloud Control Panel, select the vRack you wish to use.
From the list of eligible services, choose the Public Cloud project you want to add to the vRack and then click Add.
Integrating an instance into the vRack
This guide focuses on a simple vRack configuration between a Public Cloud instance and a dedicated server. If you have set up your instance(s) with a local zones deployment mode, note that local zones do not support the vRack for now. Additionally, the vRack is a global L2 network and does not support "zone" or "region" level resilience.
Two situations may arise:
- The instance does not exist yet.
- The instance already exists, and you must attach a private network to it.
If using a new instance
If you need assistance, follow our Creating and Connecting a Public Cloud Instance guide. When creating an instance, you can choose to connect your instance to a specific private network. Choose your previously created vRack from the drop-down menu.
In case of an existing instance
Choose your Public Cloud Project, then navigate to the Private Network section.
Create a new Private Network, taking note of the following settings:
- The region for your Private Network must be the same as that of your instance.
-
For both services to communicate with each other, they have to be tagged with the same VLAN ID.
By default, the VLAN ID for dedicated servers is 0. To use this VLAN ID for an instance, it will be necessary to tag the private network with VLAN 0 as well. Tick the Set a VLAN ID box and select VLAN ID 0.
If you do not tick the box, the system will assign a random VLAN ID to your private network.
If you do not intend to use VLAN ID 0...
If you do not intend to use VLAN ID 0, you may select a different ID between 1 and 4000. In this case:
- When configuring the vRack on the dedicated server, this VLAN ID must be included in the network configuration file(s).
It is possible to use the same VLAN ID for multiple private networks; however, this requires careful management of private IP addresses. Using non-overlapping DHCP pool allocations is one way to resolve this issue.
Unlike dedicated servers (when you use a VLAN ID other than 0), there is no need to include the VLAN ID directly in the Public Cloud instance's network configuration file once it has been defined in the OVHcloud Control Panel.
Example: if the private network of the instance is tagged with VLAN 2, this VLAN ID must be included only in the network configuration of the dedicated server. For further information, please consult the following guide: Create multiple VLANs in the vRack.
-
You can keep the default private IP range or use a different one.
Select "Enable DHCP for this private network" to automatically assign and configure the private IP address on the instance. You will then only need to configure the dedicated server’s network interfaces.
When this option is not selected, manual configuration is required on both the Public cloud instance and the dedicated server.
Make sure both Network Gateway options are unchecked.
Once done, click on Configure your private network. This will take a few minutes.
In the dashboard of the instance concerned, locate the "Networks" section and click the more options ⋮ button next to "Private networks". Select Attach a network.
In the pop-up window, select the private network(s) to attach to your instance and click on Confirm.
Configure your network interfaces
If you chose the option to configure the private network on your instance using DHCP, you only need to configure the network interfaces on the dedicated server.
Configuration when using the default VLAN ID 0
Before you begin, connect to your server via SSH and list your network interfaces with the following command:
For dedicated servers, locate the line that begins with link ether and verify that this interface matches the Private interface listed in the Network interfaces tab of your server’s dashboard.
Use this interface name to replace NETWORK_INTERFACE in the configurations below (example: eth1).
For example purposes, we will use the IP address range of 192.168.0.0/16 (Subnet mask: 255.255.0.0).
From here, please refer to the Configuration examples section of our Configuring the vRack on your dedicated servers guide.
Configuration when using a different VLAN ID
In this example, we'll use 10 as the VLAN ID (tag), and 192.168.0.0/16 as the private IP address range.
The configuration below is based on Debian 11 (Bullseye).
-
Before you begin, establish an SSH connection to your server and run the following commands to install the VLAN package:
-
Next, load the 8021q kernel module:
-
To verify that the module is loaded:
-
Run the following command to ensure the modules are permanently loaded at boot:
-
Retrieve the interface names and identify the private interface:
In this example, the private network interface is identified as eno2.
-
Next, create a VLAN subinterface for the network interface (non-persistent configuration) and assign (tag) it the VLAN ID. In this example, the VLAN ID is 10.
Replace the values with your own.
-
Next, assign a private IP address to the newly created VLAN subinterface:
-
Next, activate the private interface and the VLAN subinterface:
-
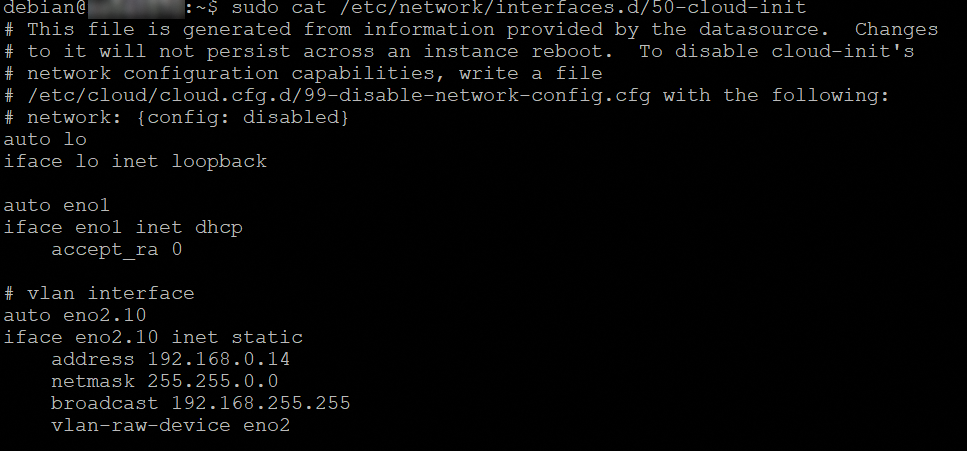
To make the configuration persistent, add the following entries to the configuration file:
-
Overview:
-
Restart the network to apply the changes:
The configuration below is based on Ubuntu 24.04 (Noble Numbat).
-
Before you begin, establish an SSH connection to your server and run the following command to install the VLAN package:
-
Next, load the 8021q kernel module:
-
To verify that the module is loaded:
-
Run the following command to ensure the modules are permanently loaded at boot:
-
Create or edit the
cloud.cfgconfiguration file to prevent automatic changes to the network configuration: -
Add this line:
Save and exit the file.
-
To obtain the network interface name and its MAC address:
-
Here, the interface we want to configure is
eno2with MAC address:d0:50:99:d6:6b:14.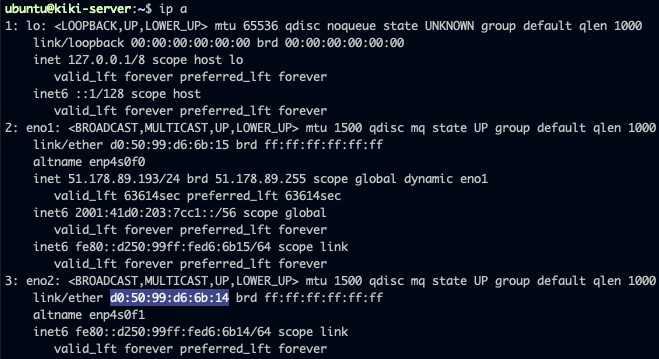
-
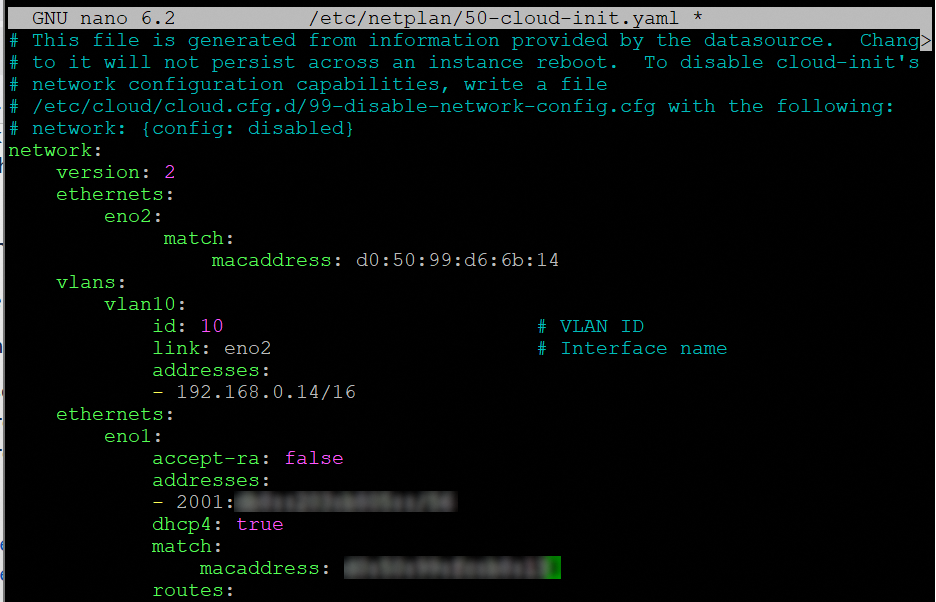
Add the network configuration for this interface and the VLAN declaration to the configuration file, ensuring it is placed directly beneath the
version: 2line. Replace the values with your own: -
Overview:
-
Save and close the file, then run the following command:
-
If you receive the following message:
-
You can resolve this by installing the following package:
-
Verify that the configuration has been properly applied:
The configuration below is based on Almalinux 9.
-
Before you begin, establish an SSH connection to your server and run the following command to load the 8021q kernel module:
-
To verify that the module is loaded:
-
Run the following command to ensure the modules are permanently loaded at boot:
-
Retrieve the interface names and identify the private interface:
In this example, the private interface is eno2.
-
Next, create a subinterface configuration file for the VLAN in the main network configuration file. In this example, the file is named
ifcfg-eno2.10, here eno2 refers to the private network interface and10the VLAN ID. -
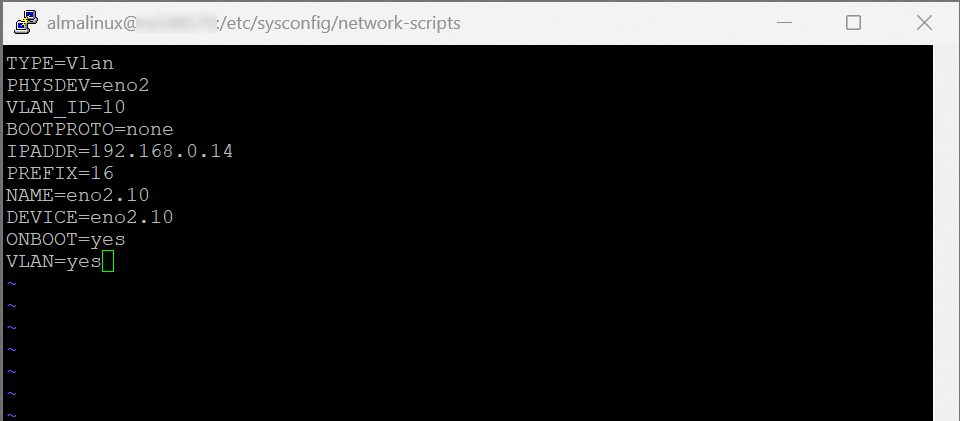
Add the following entries to the configuration file. Replace the values with your own.
Save and exit the file.
-
Overview:
-
Restart the network interface:
The configuration below is based on Fedora 43.
-
Before you begin, establish an SSH connection to your server and run the following command to load the 8021q kernel module:
-
To verify that the module is loaded:
-
Run the following command to ensure the modules are permanently loaded at boot:
-
To obtain the network interface name:
In this example, the interface is called eno2. We will need to create a VLAN subinterface before assigning a private IP address to it.
-
Use the following command to create the VLAN interface:
Replace
vlan-namewith the name of the VLAN subinterface,parent-interfacewith the name of the private interface andvlan-idwith the VLAN ID.In this example:
-
Assign a private IP address to the VLAN subinterface:
In this example:
-
Next, bring the up the VLAN subinterface:
In this example:
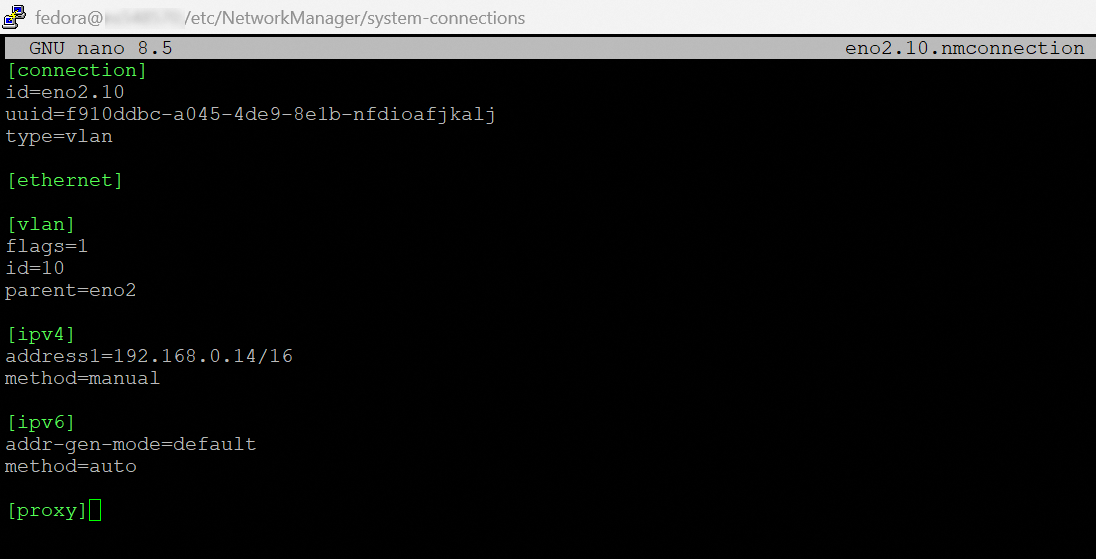
The steps above create a configuration file for the VLAN interface. This file is located at /etc/NetworkManager/system-connections/ and follows the naming format vlan-name.nmconnection.
In this example, the file is called eno2.10.nmconnection.
-
Overview:

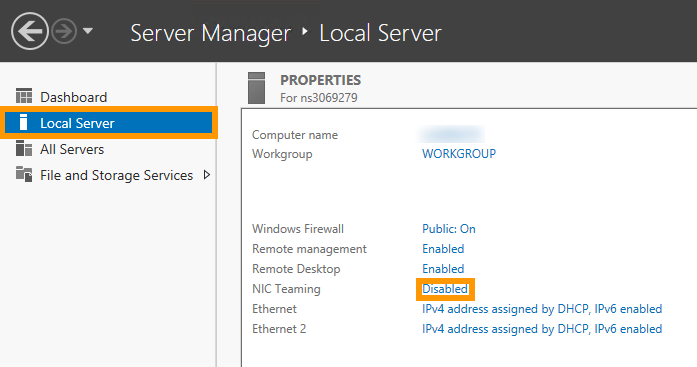
Log on to your server via a remote desktop connection, and open the Server Manager app. Then select Local Server. Now click the Disabled link next to NIC Teaming:
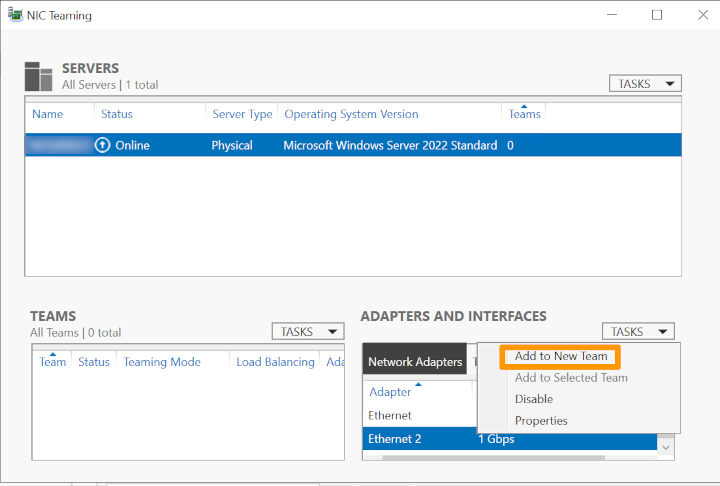
Next, right-click on the network interface and select Add to New Team.
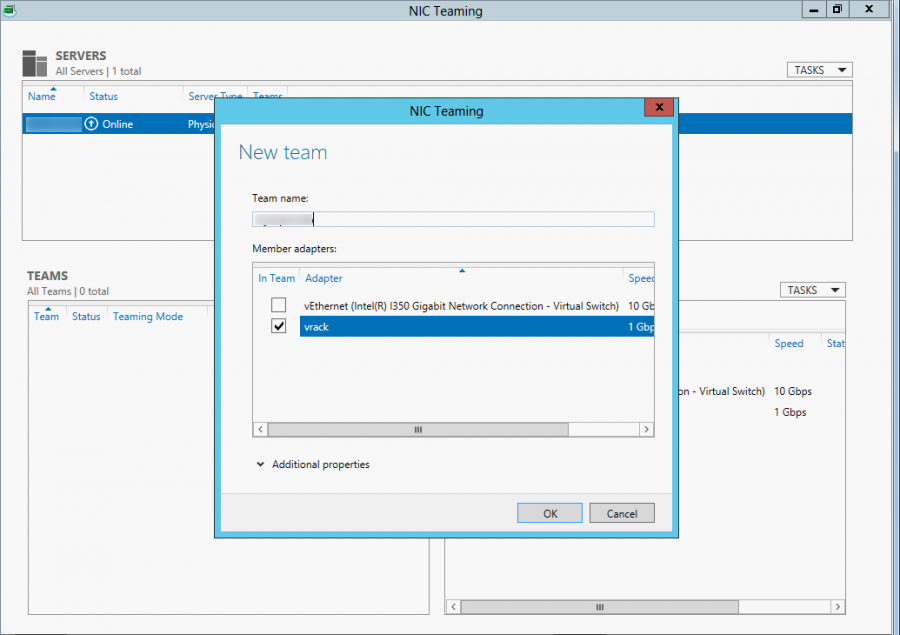
In the pop-up window, create a new team by typing a team name into the Team name field. When you have finished, click OK.
Next, we need to define the VLAN tag. In the ADAPTERS AND INTERFACES pane of the NIC Teaming screen, go to the Team Interfaces tab and right-click the interface you have just added to the new team, then click Properties. Now click Specific VLAN, and define the tag:
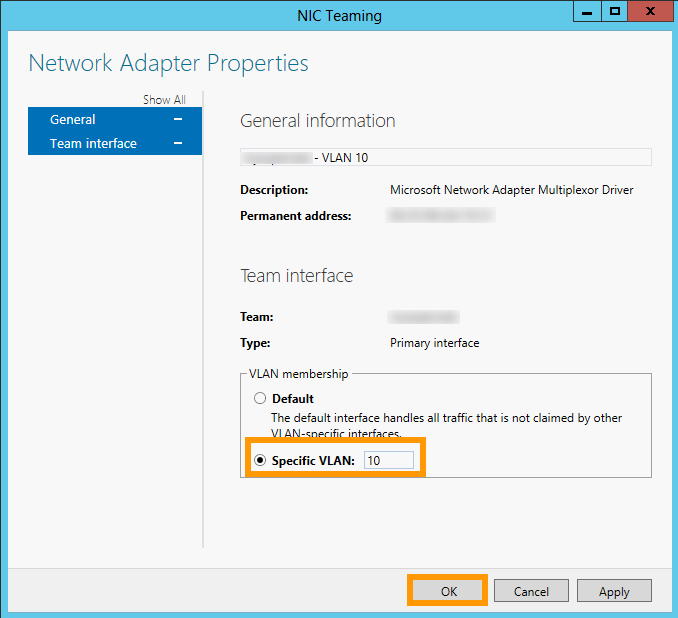
From here, continue by using the instructions for Windows configuration in our Configuring the vRack on your dedicated servers guide.
Go further
Creating multiple VLANs in a vRack
For more information and tutorials, please see our other Dedicated Server support guides, our Public Cloud guides, or explore the guides for other OVHcloud products and services.