
Learn how to enable and manage the cluster autoscaler on your OVHcloud Managed Kubernetes cluster.
OVHcloud Managed Kubernetes service provides you with Kubernetes clusters without the hassle of installing or operating them.
During the day-to-day life of your cluster, you may want to dynamically adjust the size of your cluster to accommodate your workloads. The cluster autoscaler simplifies the task by scaling up or down your OVHcloud Managed Kubernetes cluster to meet the demand of your workloads.
Requirements
- An OVHcloud Managed Kubernetes cluster
- Some basic knowledge of how to operate it. If you want to know more about those topics, please read the OVHcloud Managed Kubernetes Service Quickstart
- Some basic understanding of how nodes and node pools work on OVHcloud Managed Kubernetes.
Instructions
The cluster autoscaler
Horizontal pod scaling and cluster scaling
One of the hallmarks of cloud native environments is that they must automatically adapt to fluctuating loads. These fluctuations can be, for the most part, regular (such as day-night or work-weekend cycles) or more ad hoc (such as a Black Friday situation). A well-designed cloud native system must scale up and down to adapt to fluctuations in load without human intervention.
Kubernetes has a powerful set of features to accommodate shifting workloads: horizontal pod autoscaling.
The Horizontal Pod Autoscaler automatically scales the number of Pods in a replication controller, deployment, replica set, or stateful set based on observed CPU utilization (or, with custom metrics support, on some other application-provided metrics).
But the horizontal pod autoscaling has a hard limit, the number of available nodes in your Kubernetes cluster. It can only add pods to a Replica Set if there are enough available resources in your Kubernetes nodes, and it cannot reduce the size of your cluster if your nodes are underutilized.
In order to go further with the scalability, you need to have a cluster autoscaler. The Cluster autoscaler adds or removes nodes in a cluster based on all pods' requested resources, without human intervention.
The horizontal pod autoscaler and the cluster autoscaler work better when deployed together in the cluster, because the horizontal pod autoscaler focuses on managing pods to allow them to match the demand, while the autoscaler manages the number of nodes in the cluster to ensure that the horizontal pod autoscaler can do its role.
The cluster and horizontal pod autoscalers can work together, and are often both deployed in a cluster. When combined, the horizontal pod autoscaler is focused on running the number of pods required to meet application demand. The cluster autoscaler is focused on running the number of nodes required to support the scheduled pods.
Scaling up and down
To scale up a cluster, the cluster autoscale watches the load on your nodes and detects when your cluster has resource constraints (e.g., it cannot schedule nodes because of a lack of resources). When such a situation arises, the cluster autoscaler adds nodes to your node pools to match the demand.
The cluster autoscaler also works the other way around, monitoring underutilized nodes and decreasing the number of nodes, helping to reduce your costs.
The scaling up is conceptually easier than the scaling down. When the autoscaler detects resource constraints, it simply needs to add yet another node (providing it's under the user-defined limit of nodes). But in order to scale down, even if most nodes are underutilized, it needs to move all the pods outside of one of the nodes before deleting it.
Some considerations like pods using node selectors, anti-affinity, or restrictive PodDisruptionBudget (PDB).
For more information on the factors disrupting the scaling down of the cluster, please see the What types of pods can prevent CA from removing a node? page.
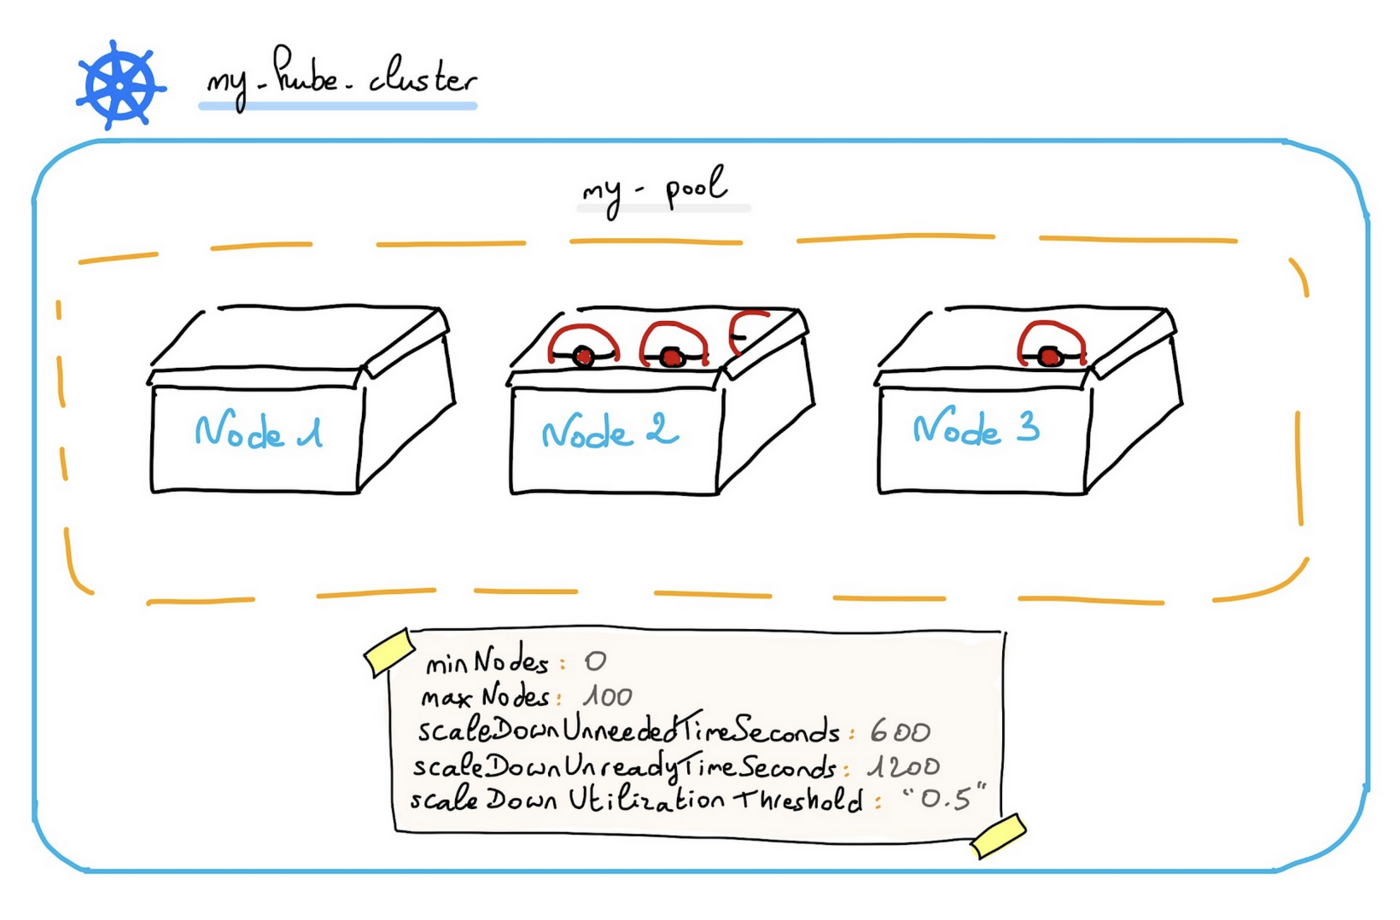
To scale up and down the cluster, the autoscaler uses user-defined parameters for things like limits (what are the upper and lower number of nodes limits in your cluster?), node resource thresholds (at what load level should it add or remove a node?), or time intervals (how often should it scale the cluster?). These parameters are described in the Configuring the cluster autoscaler guide.
Enabling autoscaling on the node pool
Using the Kubernetes API
The easiest way to enable the autoscaler is to use the Kubernetes API, for example, using kubectl.
As explained in the How nodes and node pools work guide, in your OVHcloud Managed Kubernetes cluster, nodes are grouped in node pools (groups of nodes sharing the same configuration).
Autoscale is configured on a node pool basis, i.e., you don’t enable autoscaling on a full cluster; you enable it for one or more of your node pools.
You can activate the autoscaler on several node pools, each of which can have a different type of instance as well as different min and max nodes number limits.
To avoid unexpected expenses, you should be careful not to enable autoscaling on monthly-billed node pools. However, you are still allowed to do so if you know what you are doing.
A common configuration is to use non-autoscaled, monthly-billed node pools as a base for your static workload, and autoscaled, hourly-billed node pools with smaller flavors for your dynamic workload.
When you create your cluster, you can bootstrap a default node pool in it, and you can add others in the Public Cloud section of the OVHcloud Control Panel or directly using the Kubernetes API.
To list node pools, you can use:
In my case, I have one node pool in my cluster, called nodepool-b2-7, with 3 B2-7 nodes:
As you can see, the AUTO SCALED field is set to false. Let’s see why by looking at the node pool description.
You can then get the description of the node pool in YAML format using:
For my example cluster:
In the spec section, you can see that the autoscale parameter is set to false. To enable the autoscaler, you need to patch the node pool to set this field to true.
As you can see in my example, patching the node pool definition enables the autoscaler:
Now we can begin to deploy a test workload on the cluster.
When the autoscaler is enabled on a node pool, it uses a by-default configuration. To better understand the by-default configuration and its parameters, see the Configuring the cluster autoscaler guide.
Configuring the autoscaler
Using the Kubernetes API
When the autoscaler is enabled on a node pool, it uses a default configuration.
You can change several parameter values through the kubectl command:
In my example cluster:
For the moment, only the following parameters are editable:
- autoscale
- autoscaling
- desiredNodes
- minNodes
- maxNodes
Go further
For more information and tutorials, please see our other Managed Kubernetes or Platform as a Service guides. You can also explore the guides for other OVHcloud products and services.
If you need training or technical assistance to implement our solutions, contact your sales representative or click on this link to get a quote and ask our Professional Services experts for a custom analysis of your project.